Image Masking / Cropping
If you have an image for which you would like to only engrave a portion of that image, you can use the Image Mask feature to mask off the area of the image to be engraved. At the simplest this is the same as doing a basic crop to the image, but you can go so much further than that with masking.
Basic Usage
At the simplest this process consists of an image and single, simple shape:
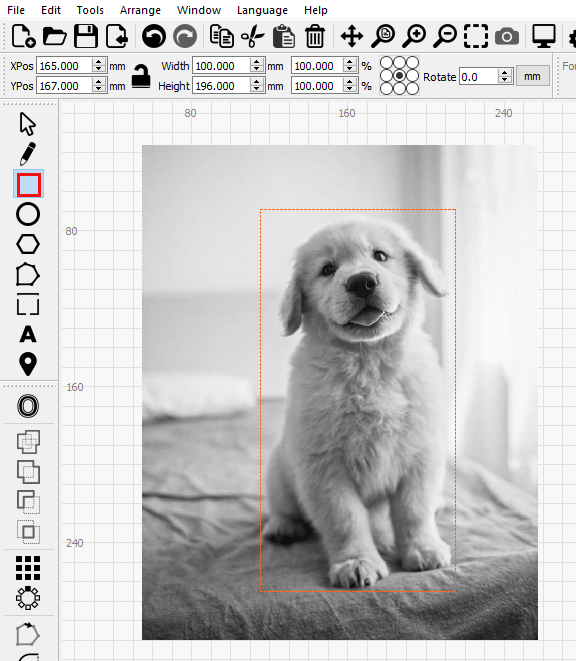
As shown here, the shape is using a Tool Layer which can be useful for this process as the masking shape will not also be output. If you also need to cut along the mask then simply use any of the normal tool layers for this process.
Now select both shapes. You can then apply a mask by either selecting Tools > Apply Mask to Image or right clicking on the selection and choosing Apply Mask to Image.

Note: You cannot mask using a layer set to Fill, as the filled output would cover the visible image. Any shape you wish to use as a mask must be either a Tool layer, or set to Line mode.
The mask will now be applied to the image as you can see below:

As you can see in the above screenshot, the selection box is still the same size as it was before. This is because the entire image still exists, but the mask is providing a windowed view into that image. If you select just the masking shape or the image, you can move it to reposition the mask.

No image data is lost during this process and you can still reposition the image or mask even after saving and reopening a project at a later time. However, as you can see in the preview below, only that part of the image that was masked off will be output:

Advanced Usage
What we've shown above amounts to merely an advance crop feature but image masking can go much further. For example, you can mask an image using multiple shapes.
Note
When using multiple shapes to mask an image, all shapes must be on the same cut/tool layer and those shapes must be grouped together. Otherwise the Apply Mask to Image option will not be available._

But you can, of course, go far beyond that. Any closed shape can be used as a mask and the easiest way to think about how that mask is applied, is that anywhere LightBurn would normally fill that closed shape in Fill Mode will now be "filled" with the image instead. For example:

Just remember that you must group together all shapes to be used as a mask first.
Removing a Mask
If you would like to remove the masking you can either simply select, then delete the mask shape or shape group, or you can select the image, right click, and choose Remove Mask from Image:

Using the Remove Mask from Image option will preserve the mask shape (or shape group) for later use.
Flattening a Mask
Finally, if you would like to "bake in" an image mask, you can select the image, right click and choose Flatten Image Mask. This will make the mask permanent, actually removing the now unused image data as well as deleting the image mask shape. As you can see below, the selection box is now smaller and the mask shape is now gone:
